


 10 minutes
 Share
ShareMetaMask Tutorial: How to Create and Use the Wallet in 2025
MetaMask has become one of the most widely used non-custodial wallets, offering beginners a simple way to store, send, and manage crypto assets across multiple networks. As a browser extension and mobile app, it acts as a secure gateway to the blockchain, enabling users to interact with dApps, swap tokens, and explore Web3 ecosystems.
For newcomers, learning how to set up and use MetaMask correctly is essential, since the wallet provides full control over private keys and requires careful security habits. This guide explains every step of the process using the latest 2025 interface, from installation and wallet creation to receiving funds and connecting to decentralized platforms.
By following this tutorial, beginners can confidently start managing their assets while understanding the basics of safe wallet usage. If you are still unsure about the basics, it is helpful to first read a general guide on What is a Crypto Wallet before moving on to this tutorial.
What is MetaMask and How Does it Work?
MetaMask is a non-custodial crypto wallet that allows users to store and manage their digital assets without relying on a centralized provider. It was originally designed for the Ethereum network, but its functionality has expanded to support multiple chains such as Polygon, BNB Chain, Arbitrum, and Avalanche.
MetaMask operates as both a browser extension and a mobile application, making it easy to access from desktop or smartphone devices. All private keys are stored locally on the user’s device, ensuring full ownership and control. The 2025 version of MetaMask includes improved phishing protection, enhanced network management, and simplified token detection features.
This combination of security and usability is what makes MetaMask a popular choice for beginners who want to explore Web3 platforms, decentralized applications, NFTs, and various blockchain networks with a single, unified tool.
MetaMask Features and Why It’s Popular
MetaMask remains a leading choice among beginners because it combines simplicity, flexibility, and full control over digital assets. Its interface is designed to work seamlessly across multiple blockchains, allowing users to manage tokens, interact with decentralized applications, and explore the broader Web3 ecosystem without switching between different tools.
As of 2025, MetaMask includes updated security alerts, built-in network recommendations, and a smoother onboarding experience for new users. These improvements help reduce common mistakes and provide a more intuitive setup process.
Key features that make MetaMask popular include:
- Non-custodial control over private keys and recovery phrases.
- Browser extension + mobile app, offering easy access on all major platforms.
- Support for thousands of dApps, including DeFi platforms and NFT marketplaces.
- Multi-chain functionality, enabling quick network switching.
- Built-in swaps and bridging options for moving assets across networks.
- Enhanced security warnings introduced in 2024–2025 updates.
These features combined make MetaMask an essential tool for anyone starting their crypto journey. For users who want to go deeper into the storage methods, it pairs well with the guides that compare different types of wallets, such as Hot Wallet vs Cold Wallet.
Step-by-Step: How to Install MetaMask
Installing MetaMask is the first step toward creating a secure and easy-to-use wallet for managing digital assets. The process is beginner-friendly and can be completed on both desktop and mobile devices. It’s important to download MetaMask only from official sources to avoid fake extensions or malicious apps.
The 2025 version includes clearer download prompts and built-in verification messages to help users stay safe during installation.
Follow these steps to install MetaMask correctly:
- Visit the official website at MetaMask.io to avoid fraudulent versions.
- Choose the appropriate browser extension for Chrome, Firefox, Edge, or Brave.
- Click “Install” and allow the extension to integrate with your browser.
- Pin the MetaMask icon to make access easier.
- For mobile users, download the app from the official iOS App Store or Google Play.
- Double-check the publisher information to ensure authenticity.
- Open the extension or app to begin wallet setup.
After installation, users can proceed to create their MetaMask wallet securely.
How to Create a MetaMask Wallet
Once MetaMask is installed, the next step is creating a new wallet. This process is simple, but beginners must follow each step carefully, especially when handling the Secret Recovery Phrase. MetaMask gives users full control over their private keys, which means there is no centralized service that can restore access if the recovery phrase is lost.
The 2025 onboarding flow includes clearer security explanations and improved visual guides to help users understand each step before proceeding.
Follow these steps to create your MetaMask wallet:
- Open the MetaMask extension or app and select “Create a Wallet.”
- Review the optional data-sharing prompt and choose whether to agree or decline.
- Set a strong, unique password for local login.
- Reveal your Secret Recovery Phrase (12 or 24 words depending on the updated setup).
- Write the phrase on paper and store it offline.
- Confirm each word in the correct order when prompted.
- Complete setup - your MetaMask wallet is now fully active.
Beginners should never share their recovery phrase with anyone under any circumstance. If you want broader context on securing different wallet types, it compelemts articles such as Crypto Wallet Security: Tips for Beginners.
Understanding the MetaMask Interface
After setting up a MetaMask wallet, beginners are introduced to a clean and intuitive interface designed to simplify navigation across networks and assets. The 2025 update improved the layout, making it easier to locate essential features and manage balances without confusion. Each element of the interface serves a specific purpose, helping users understand how to send, receive, and track their crypto assets efficiently.
Becoming familiar with these sections is critical before performing any transactions, as it reduces mistakes and supports safer wallet use.
Key areas of the MetaMask interface include:
- Wallet balance – displays total asset value across networks.
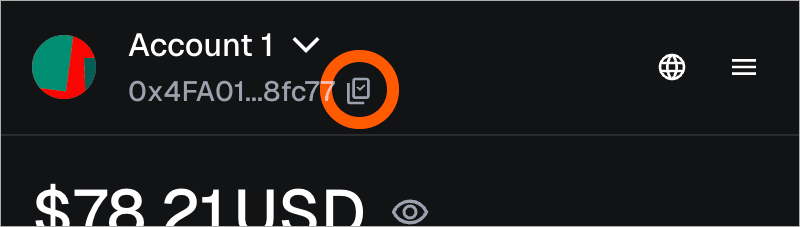
- Account address – the public wallet address used for receiving assets.
- Network selector – switch between Ethereum, Polygon, BNB Chain, and others.
- Tokens tab – view added assets, including stablecoins and custom tokens.
- Activity tab – track all confirmed and pending transactions.
- NFTs tab – manage supported digital collectibles.
- Settings & Security menu – manage passwords, networks, privacy alerts, and recovery options.
How to Add Networks to MetaMask
MetaMask is designed to operate across multiple blockchain networks, which makes it useful for sending assets, interacting with dApps, and exploring different ecosystems. By default, MetaMask starts with the Ethereum network, but users can easily add others such as Polygon, BNB Chain, Arbitrum, Avalanche, and Base. Using the correct network is essential when receiving or sending crypto, as sending assets to an incompatible network can lead to permanent loss. In 2025, MetaMask simplified network additions with clearer warnings and automated verification checks.
Two reliable methods are commonly used to add networks:
- Add networks manually:
- Enter the RPC URL, Chain ID, network name, and currency symbol directly in MetaMask settings.
- Use Chainlist.org:
- Search for the desired network, verify the source, and click “Add to MetaMask.”
Always ensure that RPC data comes from trusted providers. Avoid unverified network prompts or links that appear on random websites or social media posts.
How to Receive Crypto in MetaMask
Receiving crypto in MetaMask is a straightforward process, but beginners must pay close attention to network compatibility to avoid accidental loss of funds. Each network, such as Ethereum, Polygon, or BNB Chain, uses a different version of the same wallet address, which makes it possible to receive tokens across multiple chains. However, the sender must always select the correct network when completing the transfer. MetaMask’s 2025 interface includes clearer network indicators and warning messages to help users confirm that they are receiving assets safely.
To receive crypto in MetaMask, follow these steps:
- Open the MetaMask extension or mobile app.
- Select the desired network from the network dropdown.
- Click “Receive” to display your public wallet address (0x...).
- Copy the address carefully or use the QR code option.
- Share the address with the sender and verify the network they are using.
- For safety, request a small test transaction before transferring a larger amount.
Following these steps helps beginners avoid common receiving errors.
How to Send Crypto from MetaMask
Sending crypto from MetaMask is simple, but users must take a few precautions to ensure that transactions reach the correct address and network. One small mistake, such as selecting the wrong chain or entering an incorrect address, can cause funds to be lost permanently.
The 2025 MetaMask update introduced improved gas estimation, clearer confirmation screens, and enhanced warnings before sending assets, making the process safer for beginners.
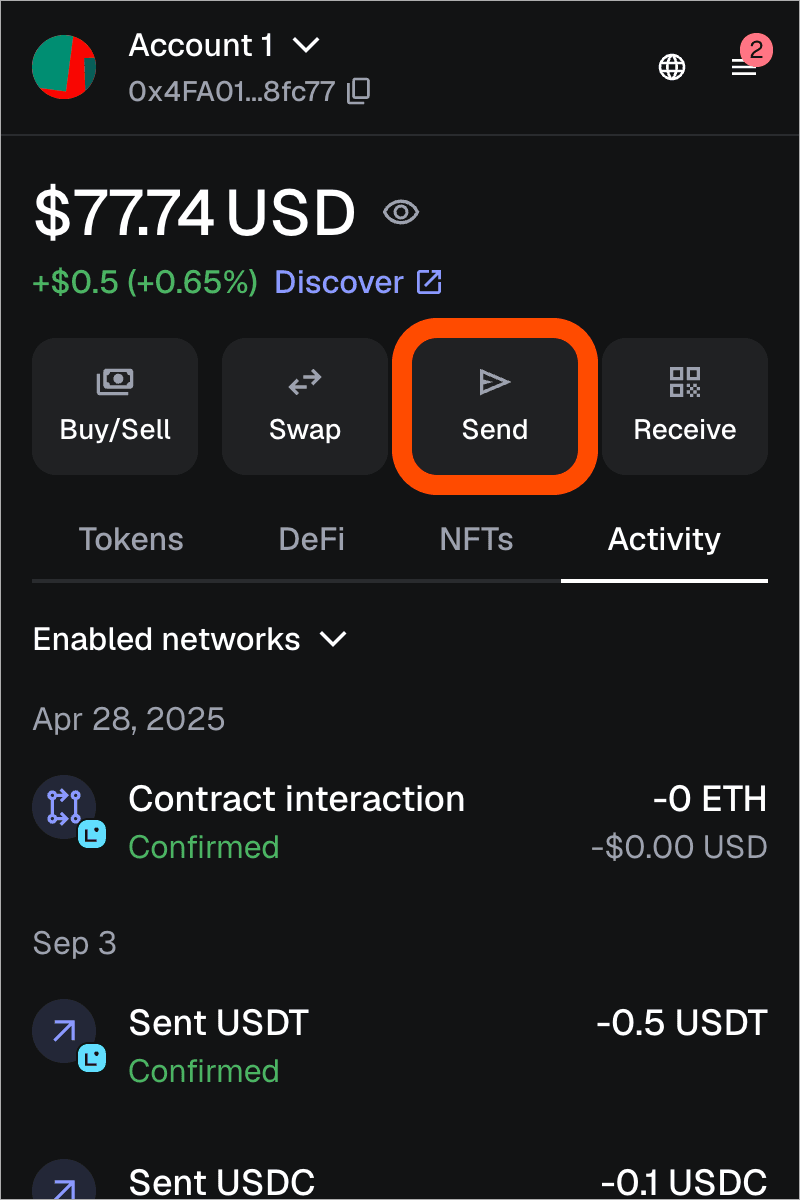
To send crypto from MetaMask, follow these steps:
- Open MetaMask on your browser or mobile device.
- Choose the correct network based on the asset you want to send.
- Click “Send” from the main wallet screen.
- Paste the recipient’s wallet address carefully or scan their QR code.
- Enter the amount you want to transfer.
- Review the gas fee details and select your preferred speed option.
- Click “Confirm” and wait for the transaction to process.
- Track the status through the Activity tab or by checking the transaction on Etherscan or the relevant network explorer.
This process allows users to send assets confidently and avoid common sending errors.
How to Connect MetaMask to dApps
Connecting MetaMask to decentralized applications is what allows users to explore Web3 services such as DeFi platforms, NFT marketplaces, blockchain games, and staking protocols. The 2025 version of MetaMask includes an updated connection flow that displays clearer permission requests and network switching prompts, helping beginners avoid unsafe or unauthorized interactions.
Before connecting to any dApp, users should always verify the website address and ensure they are using the correct network, as malicious sites often imitate popular platforms.
To connect MetaMask to a dApp, follow these steps:
- Open the dApp’s official website and select “Connect Wallet.”
- Choose MetaMask from the list of supported wallet options.
- Approve the connection request that appears in the MetaMask popup.
- Review the permissions the dApp is requesting and confirm them.
- If required, switch networks using MetaMask’s prompt.
- After connecting, you can sign transactions, trade assets, mint NFTs, or interact with smart contracts.
Users should disconnect from unfamiliar dApps after use to maintain higher security.
Security Tips for MetaMask Users
Because MetaMask is a non-custodial wallet, users are fully responsible for protecting their private keys and recovery phrases. Strong security habits are essential, especially as phishing attacks, fake browser extensions, and malicious signing requests continue to rise across Web3 platforms. The 2025 MetaMask update includes enhanced security checks, but users still need to take their own precautions.
Following the tips below helps beginners minimize risks and keep their assets safe from unauthorized access.
Essential security tips include:
- Never store your recovery phrase digitally, including screenshots or cloud notes.
- Enable biometric authentication on the mobile app when available.
- Use a hardware wallet integration (Ledger or Trezor) for larger amounts.
- Install MetaMask only from MetaMask.io, avoiding links from social media.
- Turn on advanced phishing protection in the wallet settings.
- Avoid signing unknown or suspicious transactions on unfamiliar dApps.
- Regularly update browsers, apps, and operating systems to block known vulnerabilities.
By adopting these practices, beginners can significantly improve their wallet security.
MetaMask vs Exchange Wallet: Which Should Beginners Choose?
Choosing between MetaMask and an exchange wallet depends entirely on a user’s experience level, goals, and security preferences. MetaMask gives full control over private keys, making it ideal for interacting with dApps, trading on decentralized platforms, collecting NFTs, and exploring Web3. However, this freedom comes with responsibility, users must secure their recovery phrase, verify connections carefully, and remain alert to phishing risks.
For beginners who want a simpler and safer entry point into crypto, an exchange wallet like the one offered by Cryptal is often the easier option. It removes the complexity of managing private keys and provides a secure environment where users can buy, store, and convert assets instantly. Cryptal’s internal wallet is protected by platform-level monitoring, advanced security protocols, and a user-friendly interface, making it suitable for everyday use and smaller holdings.
In practice, many users rely on both: Cryptal for convenience and MetaMask for Web3 activities or long-term control.
Summary
MetaMask remains one of the most powerful tools for anyone looking to explore Web3, offering complete control over digital assets and access to thousands of decentralized applications. For beginners, understanding how to install, create, secure, and use this wallet is essential before interacting with dApps or sending transactions. While MetaMask provides flexibility and independence, it also requires strong security habits and careful management of private keys.
For those who prefer a more guided and beginner-friendly approach, Cryptal’s internal wallet offers a secure and simple alternative for storing and managing assets without the need to handle recovery phrases. Combining both options allows users to enjoy the best of both worlds: convenience on Cryptal and full autonomy through MetaMask. By following the steps in this guide, beginners can start their crypto journey with confidence and clarity.